11 Stylish Video Transitions Effects for your Vlogs & Films

Hi, guys, it's Shivanshu again and I was thinking that I didn't post anything about premiere pro or filmmaking for a long time, so here we go I've selected some cool and professional adobe premiere pro tricks or transitions in this post I've talked about some very professional so read this article very carefully people don't read it or skip some parts of the post then comment that "this post is useless" I think this post will really help you because I also add videos if you don't want to read then you can watch it and I am sure you will gonna like these tricks, brace yourself, now shut the introduction and start the article. before we started I want to tell you something that we can create endless transitions if you use your creativity by adding a small thing makes a huge difference changing of colours, duration or shape can change the looks of your clip so use your creativity and make new things.


Crop open/close
Flash & Film Burn
Luma Style Fade
Flickering Strobe Transition
Glitch transition
Posterized Time
Invert
Paint Bucket
Emboss
Strobe Light
4-Colour Gradient
Conclusion


5 Stylish Video Transitions Effects for your Vlogs & Films (Adobe Premiere Pro CC Tutorial / How to)

1. Crop open/close

in many youtube videos, these transitions were used and this is the best transition to start and end your video doesn't matter it's a youtube video or any other but believe me it feels so professional and very simple to do after changing some effects settings you can make it more attractive and unique. now let us talk about how the transition looks, in the start transition opens from north to south or you can change it to the west to east.

how to do it -

open adobe premiere pro and set your adobe premiere pro to default workspace and then go to the effects panel and search "barn doors" drag and drop to your clip.

I suggest you use this transition at the starting of the video or at the ending. drop transition at the start or at the ending of the video/clip now click on the effect, you can see an effective option at the starting of the video click on it, now effect control panel opens automatically you can see two windows, A written on first and B has written on the second, there is a small box present there and you can see some arrows, this is an option you can change opening sides by using it, like south to north or east to west, open adobe premiere pro to understand easily, stretch out the transition for increasing the duration I will recommend you to set 1 second and 1 second is by default set so you do not have to do much, by increasing the duration you can see a slow crop open effect.


5 Stylish Video Transitions Effects for your Vlogs & Films (Adobe Premiere Pro CC Tutorial / How to)

Flash & Film Burn

flash and film burn effect is a great transition if you want to make a jump cut from one clip to another clip it goes very fast and looks pretty much attractive and cool if I want to describe that how it looks so suddenly a white flash came and gone hard to notice but great transition or effect to make a jump cut this is good for vlogs, film making and etc.

How to do it -

  • Open adobe premiere pro and search "dip to white" effect in the effect search panel.
  • Drop effect between 2 clips and then click on the transition.
  • Visit to effect control panel and adjust it.
  • Change "alignment" to the centre cut.
  • Decrease the duration of effect to make it non-noticeable and a fast flash.
  • Sync your effect with a bunch of different kinds of music. 
  • if you don't want to make a white flash then take stock footage, dark and colourful non-complex easy to blend bring that footage to the top of the timeline and where you want to make the transitions click on the footage and go to the effect control panel and change opacity to blend and you are done I hope you select good stock footage and the outcome is really awesome.

5 Stylish Video Transitions Effects for your Vlogs & Films (Adobe Premiere Pro CC Tutorial / How to)


Luma style fade

luma style fade is a bit complex but not much it looks so cool and professional it's very creative for more information you can see the video to understand better scroll down to see.

How to do it -

  • to create this effect overlap 2 video files on each other 
  • open effects library and search gradient wipe
  • drag and drop the transition into your clip
  • adjust transition completion and transition softness for better results.
  • And that's all it's short and easy to do the transition in just four steps.

5 Stylish Video Transitions Effects for your Vlogs & Films (Adobe Premiere Pro CC Tutorial / How to)

Flickering strobe transition

This transition is pretty easy to use and create you just have to follow a few steps and that's all it's done so let's know how this transition looks like. it's pretty much awesome and quite attractive in this transition we use two different video clips after compleating it both clips flash one by one I know you are a bit confused that how it looks or is it great. for more information, I've attached a video file on the bottom of the page click there and learn easily by watching a tutorial video.

How to do it -

  • First, import your 2 different audio files on the timeline 
  • Open effects library and search an effect called "strobe light"
  • Drag and drop it on the clip.
  • Make sure you have to overlap clips on each other one clip should be on timeline 1
  • and the other two clips should be on the second timeline. to make this process easier.
  • Place your play indicator on the start of the effect and then go to the effect control panel and adjust an option called "blend with original" from 0 to 100 
  • and now it's done your effect is ready.

5 Stylish Video Transitions Effects for your Vlogs & Films (Adobe Premiere Pro CC Tutorial / How to)

Glitch effect

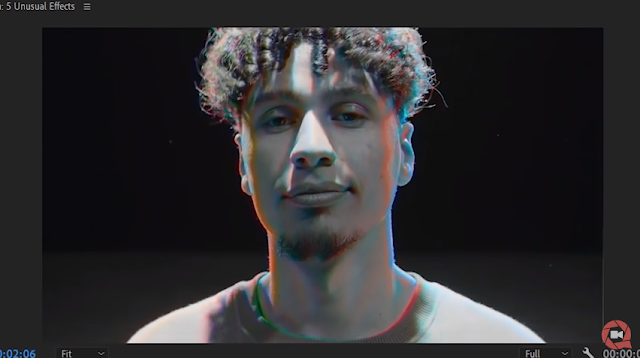
Now we are going to talk about a glitch effect. this effect is very unique and some kind of futuristic you can use it on any video or song I will recommend you to use this effect on any clip which has been shot in low light or night environment use more colours or buildings which looks very beautiful. a glitch transition like its name creates a glitch on the video and looks so cool. for more information watch the video.

How to do it-

for creating this effect first import all media data to your timeline
  • we also need an adjustment layer, to create an adjustment go to the file-new-adjustment layer, your adjustment layer has been created in the media library import it into your timeline.
  • open your effect library and search "wave warp"
  • drag and drop it to your adjustment layer
  • open effect control panel and change wave type to "noise"
  • increase the height or width as much you want
  • increase the speed to make it more fast and hard to notice.

Posterized Time

In this effect, you can achieve a kind of lag effect on your video clip this effect will reduce the FPS and then adding some more effects your video will look fantastic. this effect has been used in "Avengers Age of Ultron" when scarlet witch shows something to thor.  I also like this effect cause it's look's so professional. so let's learn how this can be performed.

AWESOME Creative Video Effects in Adobe Premiere Pro!
  • Open Adobe Premiere pro 
  • Import your video clip 
  • Now make a copy of the same clip on the timeline by holding "ALT".
  • Go to the effect section and search "Posterized time" effect.
  • Drag and drop the effect to your video clip
  • In the effect control panel, we can see an effect called "Posterized"
  • There your FPS can be 24 change it to 6 FPS.
  • Now you can see a bit of stop motion.
  • Now we will blend it to make it more smooth, go to " Opacity " and change normal to "screen" blending mode.
  • We're done now you can play your clip and I am pretty sure you gonna like it.

Invert 

Invert can change the colour of your video in like Negative or more by using and adjusting you can get your perfect effect. this effect is also used on a music video ' Feels ' from Calvin Harris.


AWESOME Creative Video Effects in Adobe Premiere Pro!
  • Open adobe premiere pro 
  • import your video clip in the software
  • Go to effect library and search "Invert" 
  • Drag and drop the effect to your video
  • Now in the effect control section, you can see the "invert" option go there and channel to what you need.

Paint bucket

So when you apply this effect to your video this looks a bit weird but after a few changes, this effect looks so cool. you can make a Scribble effect with this you won't need to make your scribble manually frame by frame, this technique makes it super fast just change some settings and your scribble effect is ready.


AWESOME Creative Video Effects in Adobe Premiere Pro!
  • Open adobe premiere pro 
  • import your video to the timeline
  • go to effect library and search "paint bucket" effect
  • Drag and drop the effect to the video clip
  • Change some settings with ''fill point'' by dragging your mouse around. change colour, Opacity and tolerance and your effect are ready now.

Emboss

After applying Emboss effect your video look's a bit weird but after changing some settings your video looks very different at the edges of the object you can see an RGB effect which feels like the 3D effect.


AWESOME Creative Video Effects in Adobe Premiere Pro!

  • Open your adobe premiere pro 
  • import you video clip
  • open effect library and search emboss effect 
  • Create a duplicate video by Alt + right-click drag it to the upper timeline 
  • drag and drop it on your First video
  • Now go to opacity and change it to the "colour" option.
  • There you can see a black&white + 3d effect in your video
  • You can also select the "Softlight" effect to remove black&white.
  • you can use an effect called "Fiend edge" instead of "emboss". this technique works exactly the same but gives you a different result.
  • And you're done if you like any trick then tell me in the comment section.

Strobe light

This effect basically gonna flash white solids into your video.  with the strobe duration and period, you can change how fast you want it. not only white you can change colours also if you don't like it this effect can be useful for some specific scene. you can also make it transparent and place other videos on the timeline and this looks pretty cool this effect can be used in like flashback videos.


AWESOME Creative Video Effects in Adobe Premiere Pro!
  • Open adobe premiere pro 
  • import your file/video
  • open effect library
  • Search "Strobe light"
  • Drag and drop it on the video
  • now you can see the effect
  • open effect settings
  • reduce the duration to 0.6 
  • you can change some more settings like colour etc...
  • Done.
  • some more tricks you can do like copy the video and past in the upper timeline then move the upper timeline some FPS ahead then you can see an error effect.

4-colour Gradient

when you drag and drop this effect on the clip so many colours you can see on the screen.
To this effect, we will make our own custom lens flare in just a few steps. At first, when we drop this effect to the video it looks like a rainbow exploded but we need to change the colours of each point and create a custom lens flare. the brighter the colour you pick the more prominent they will become.

AWESOME Creative Video Effects in Adobe Premiere Pro!
  • Open adobe premiere pro 
  • import your file/video
  • open effect library
  • Search "4-colour Gradient"
  • Drag and drop it on the video
  • now you can see the effect
  • open effect settings
  • Adjust 4 colours as you want to and make your lens flare I suggest you make your lens flare with brighter colours
  • Adjust more settings as you think like - Blend, jitter etc.
  • now go to Opacity > blending mode > Screen. and it's done.
Earn 20,000/- monthly - Read more


                                Video by Justin Odisho l Copyright by Justin Odisho l Youtube

Conclusion

Thank you guys for reading this article I hope you like it and learn some cool tricks of adobe premiere pro. I post this kind of work so if you like it make sure you do comment and tell us your user experience and ask your question I will really try to answer it follow us on our social media accounts to stay updated. 

Comments

2020

How To Create Stylish and Responsive "Contact Us" Page In 2021

Contact Us page is really important if you're a blogger, it helps your audience and sponsors to contact you and Give you Feedback that can help your business to resolve problems and be better than it was, Contact us page is also important if you want an Ad-sense account because of Google's Term&Conditions. like Contact Us, Privacy Policy, Disclaimer, About us, and Sitemap are really important some people also say that these pages increase your authority which is good for the long term, and These pages are also good for your SEO. Most of you guys are searching terms like the Contact us page on the website, Generate contact us for the blog, How to make contact us page, Contact us template. In this article I am will show you how you can create your own Stylish and Responsive Contact us page, I used 2 methods to create an amazing contact us page you can use any of them you like the most, feel easy, and comfortable. What is a "Contact us" page? Any other name for the

The Ultimate Guide On SEO To Rank #1 - TechConqueror

SEO ( Search engine optimization ) is getting harder day by day. There is a lot of things new bloggers forget to do while preparing an article. These mistakes will never help you to rank your article on Google's search results. I am a blogger and in the journey of years in this field, I gathered lots of experience. I want to share some of my experiences that will help you a lot to rank your article and improve your site performance. these tips are not too hard to follow but some things in this article will consume some of your time. Half knowledge is always a disaster, read the complete article to achieve the best results. Audio file of the page by Techconqueror:

What Is Event Blogging? Business Model Of An Event Blog In 2021

Event Blogging is a Short and easy method to earn money in a short span of time, it helps users or content creators. Mostly event blogging is based on an Up-coming Event Like a sporting event or a Festival like New year, Christmas and etc. Audio file of the page by Techconqueror: Your browser does not support the audio element. Overview of Event Blogging What is Event Blogging? Is Event Blogging No Longer Valid? Career Opportunities In Event Blogging? What is Micro-Niche Blog? How to choose an event blog niche and Best Event Blogging Topics Which niche is most profitable? How to make money through an event blog? How to find the right keyword? Purchasing a domain for an event blog? How to set up an event blog? How to write content for an event blog? How to make quality backlinks? Overview of Event blogging. Event blogging  is a work of a few days or weeks the aim is to grab  Thousands  of visitors in a day or in a week

How To Make HTML & XML Sitemaps For Blogger And WordPress

Introduction Whenever we are creating a site there are few things that should be on your webpage. There are pages that can increase your SEO and help your users to understand better about you and your site. Pages like About Us, Disclaimer, Privacy policy, Cookie policy, Contact Us and Sitemap are very important nowadays. These pages are also important for SEO and Adsense. In this article we will only learn about "Sitemap", How we can make an HTML Sitemap? and What is the difference between HTML & XML Sitemap? and many more. WordPress makes this process easier, but in Blogger we have to do almost everything on our own. Making Sitemap in Blogger is not an easy task but it's not very hard too Just complicated. Follow the given steps. I will suggest you read the entire article for a better understanding of everything related to HTML & XML Sitemaps. Audio file of the page by Techconqueror: Your browser does not support the au

How Hackers Can Crack Your Password In Minutes

Audio file of the page by Techconqueror: